Quickstart Guide
The system is administrated exclusively through the web administration portal. You can access this by visiting <http:/127.0.0.1:8998> in your web browser, or by clicking the Admin/Setup Profiles link within the tray app menu.
Administration Username/Password
Please note, most administrative options require a login. The default details are:
Username: msr
Password: msr20
You can change the username and password from within the administration system, and they will not be reset when upgrading to future releases.
Status Dashboard
When navigating to the administration portal, you will be initially presented with the main status dashboard, which gives information about service versions, health of the services and whether they are running correctly, along with various history and log information. The main aspects of the dashboard are shown in the below screenshot and described below:

Web/Profile Service Version. This indicates the release version of the installed web and profile service.
MSR Service Status. This indicates whether the web/profile service which configures and automates the profiles can communicate with the low-level MSR service, which translates the settings into the underlying requirements and performs the actual reading/writing of the underlying subsystems. It has three main colour indicators.
Green = communication is successful, and all functionality is available.
Amber = communication is successful, but some functionality is limited (as per this example).
Red = communication is unsuccessful. Either the MSR service is not running, or there is a communication issue between the two services.
If this indicator is amber, it indicates that either the CPU or underlying subsystems will not support all the key functionality required for all profile settings, but could still support enough to be operate in a degraded fashion.
If the indicate is red, it indicates that the MSR service cannot be reached, and therefore the system will not be able to apply any profiles or settings.
Specific causes and potential fixes for these issues are discussed within the Troubleshooting section.
Current Settings. This shows the current (non-default) settings of your system, as extracted and read from the MSR service.
Recent Profile/History. This shows a brief history of any profiles that the web/profile service has applied, its type (whether this has been triggered manually or in an automated), and whether it was successfully applied. Further useful information can be found by clicking the relevant details links.
Profile List. This shows all standard profiles and a summary of the settings and triggers applied on each. Further details, and manual apply/ editing of profiles can be obtained by clicking the relevant links.
Application Profile List. This shows all application profiles and a summary of the settings. An application profile only differs from a standard profile because, as the name suggests, it is linked to when an application runs as opposed to a profile that can be manually applied or be applied when a power status changes. They can also apply to a default path (e.g. any apps in a folder).
Navigation Links. You can quickly link to the other two main parts of the web interface here - the administration section (covered below), and the log section. The log page amalgamates logs from both the web/profile and MSR service in a single place, and allows you to filter and download these in a single file. This is very useful for debugging and reporting issues.
Adding a Profile
Assuming that the service status banner on the dashboard is green, and the services can communicate, we can begin to configure some profiles.
Profile Types
As already mentioned, profiles are the key method of defining power and performance settings within the system. Profiles are split into two main types:
Standard Profiles
A standard profile is one that can be manually applied by the user on demand, or linked to system triggers, such as on-boot, on-resume, and on power source change (e.g. AC power or DC power).
App Profiles
An app profile differs from the standard profile only in how they are applied; they are always linked to the launch of a specific application or program on the host system and cannot be applied on system triggers, such as power/boot.
Linked Profiles - Key Concepts
As well as individual settings for a profile, such as Undervolting, core parking, minimum/maximum clock speeds and so on, it is also possible to link one profile to another.
If you link a profile, it simply means that settings stored against the linked profile are pulled into (or inherited from) another profile as defaults, and can then be updated and overridden individulaly if required. Updating the settings in the linked profile will automatically apply these to any profiles that are using it, without the need to individually update each one. As you can imagine this substantially reduces and administration required.
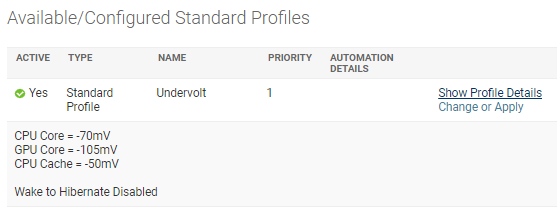
As a real-world example, let us say that we have created a standard profile with things that we wish to be common to all of our other profiles, such as Undervolt settings. Our profile is called “Undervolt”.

We also wish to create profiles that apply in certain scenarios - for example, one with power limited to 20 watts for DC usage, and a higher power limit for when we are plugged into a charger. Both of these will use our standard Undervolt settings, but we really don’t want to have to put the individual undervolts in each profile as it’s a lot of duplication, and if one of the UVs turns out to cause instability we have to update all three profiles.
The solution is simply to select the “Undervolt” as our linked profile when creating the 20W DC and other profiles. This will cause all the settings in the Undervolt profile to be pulled in as default, although we can override these individually if required. Whenever the undervolt profile is updated, the default settings will also update on the other profiles:

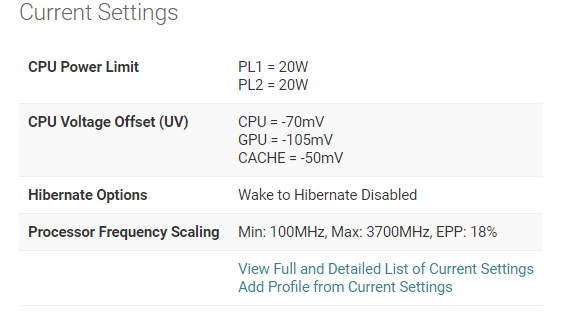
When we apply the 20W profile, it also applies the relevant undervolting:

Creating a New Profile
On a clean install, there will be no profiles contained within the system, so the first step is to add at least one of these.
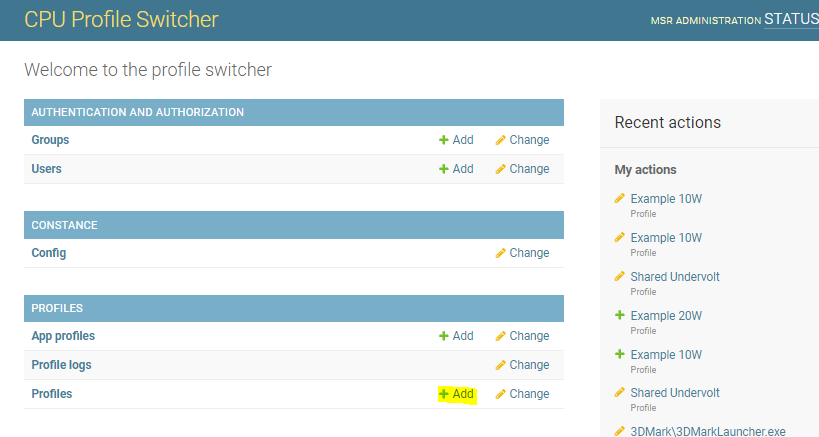
As a real world example, let’s add a Base Profile with a couple of standard settings that we intend to use for other profiles too. Navigate to the Admin and Configuration link located at the top of the page, and click the Add button located under the Profiles section, as shown below:

Adding the Base Profile
On the Add profile page, enter a name, such as Base Profile.
Shortcut profiles appear as a quick toggle within the tray icon app, so uncheck this as we don’t want our base profile to appear there.
If a profile is not marked as Active, it will not automatically apply if any automation is selected, and it will not appear in the shortcut list within the tray icon. Effectively, it is disabled, so make sure the base profile is has a ticked Active checkbox.
For now, we are going to leave all settings as default other than a couple:
CPU Voltage Offset (UV)s
These settings allow us to apply a relative voltage offset (also known as an Undervolt) to a specific part of the processor. This can help to reduce power consumption, and therefore temperatures too.
Ideally, the lower the voltage offset the better, but setting it too low will cause likely cause your system to crash instantly, or when under strain. The limit that will work for your hardware really depends on the individual processor you have (the so called Silicon Lottery). What values work for one chip will not work for another.
If you do not know what your optimal UV settings are, we would suggest you start with a moderate reduction (e.g. -50mV) and work your way up, ensuring that your system seems stable when under stress, using a benchmark or demanding game to determine this.
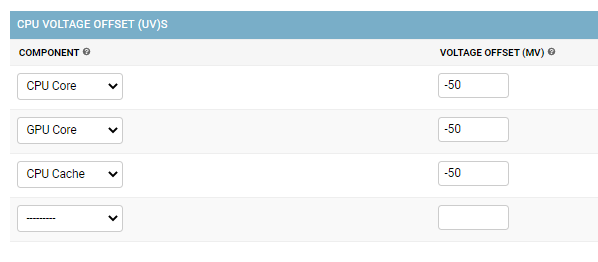
To apply an offset, simply select the component from the drop down, and enter a Voltage Offset as an integer value. The example below contains some moderate values that should be stable on most systems, but feel free to replace these with more specific values if you already know the optimum for your CPU:

Disable Wake to Hibernate
Hibernate Options -> Disable Wake to Hibernate = yes
By default, Windows has a timer whereby if the system has been suspended to RAM (e.g. by shutting the lid or similar), it will wake it from suspension after a specified period of time, and go into a more permanent suspend state (hibernation).
This wouldn’t normally be a problem, but very often hibernation can fail, and Windows does not seem to put the device back to sleep - meaning that you can end up with a device running on full power, in a bag or similar, and find that it is completely flat when you come to re-open the lid.
If this sounds familiar, select this option to completely disable the Wake to Hibernate option and ensure your device will remain suspended to RAM.
Once you are happy with your Base Profile, hit the Save button, and the system will take you to the Profile list, where you should see your new profile. You can hover over the “Used By” link to get a quick view of the settings defined within the profile:
Adding a Boot Profile
Next, we will proceed to add a more specific profile. I want this profile to set the TDP of the CPU to 30W on boot, but only when connected to AC power.
I also want it to inherit all the settings from the Base Profile we just created, so I don’t have to re-enter all my undervolt settings, and so I can change them just in one place if I discover the system is unstable. Once again, select the Add Profile Icon icon, and enter the following settings:
Basic Details
Setting Name
Value
Name
30W AC Boot Profile
Active
Checked
Shortcut
Checked
Linked Profile
Base Profile
Automation Details
Setting Name
Value
Apply On Boot
Checked
Apply On Power Status Change
Charger attached (AC Power)
CPU Power Limits
Power Limit Type
Enabled
Clamped
Power Limit (W)
TDP/Power Long Window (PL1)
Checked
Unchecked
30
TDP/Power Short Window (PL2)
Checked
Checked
30
Again, save this profile and return to the profile list to verify it has been added successfully.
Note, any profiles that are added with the shortcut option will appear within the tray application, and can be selected to apply them immediately even if automation options are enabled:
The tray icon will change to an orange colour as the profile is applied, and should return to green once completed. Click on the icon again to verify that the settings have been applied.
Adding a Boot Profile (Again)
I want to add another boot profile, but this time one to apply to DC power and to set the TDP to a lower 20W.
Once again, select the Add Profile icon, and enter the following settings:
Basic Details
Setting Name
Value
Name
20W DC Boot Profile
Active
Checked
Shortcut
Checked
Linked Profile
Base Profile
Automation Details
Setting Name
Value
Apply On Boot
Checked
Apply On Power Status Change
Charger removed (Battery/DC Power)
CPU Power Limits
Power Limit Type
Enabled
Clamped
Power Limit (W)
TDP/Power Long Window (PL1)
Checked
Unchecked
20
TDP/Power Short Window (PL2)
Checked
Checked
20
Save the profile. Again, verify it has been correctly created using the profile list and the tray icon if required.
Great, now what?!
Once completed, you should be able to test the automation by taking your device off charge, and vice versa. Give the system a few seconds to detect and apply the profile, then check the tray icon to see if the settings have been applied.
In addition, the system keeps a continuous log of when profiles are applied, and the reason for their application. This can be accessed within the main Status Dashboard, under the Recent Profiles header. Various details, including raw communication information between the services, can be accessed by clicing on the relevant “All Details” link.
Boot Profiles on Resume
Profiles marked as boot profiles also apply on resume (e.g. opening the lid). This is because the CPU/OS will reset certain features when the system resumes, so we counter that by applying the relevant boot profile. The exception to this is if you have an application and app profile already running on resume - the system will pick the running app profile rather than a boot profile in this circumstance.
This is really just scratching the surface of the options available within the services. For a more detailed breakdown of the individual options available within a profile, see the Profile options section, and to set profiles that automatically apply when a game or application is launched, see the Application Profiles section.
